Introduction
In August 2025, OpenAI made a significant shift by releasing GPT-OSS-20B and GPT-OSS-120B, their first open-weight language models since GPT-2. For traders and developers in the algorithmic trading space, this presents a unique opportunity to run advanced AI models privately, without API rate limits or recurring per-token costs.
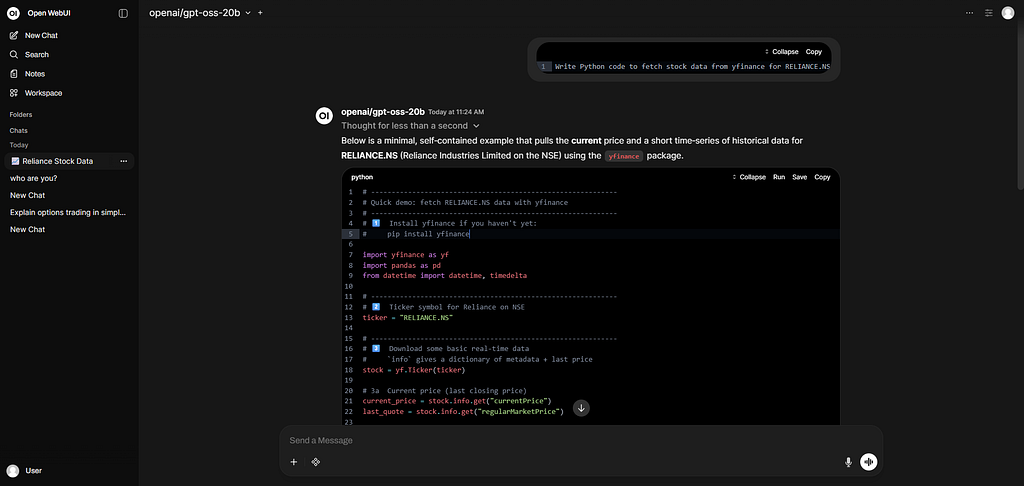
This guide walks you through the complete process of setting up your own self-hosted AI infrastructure using OpenAI’s GPT-OSS-20B model. Whether you’re building trading bots, analyzing market data, or creating educational content, having a private AI instance gives you complete control over your data and infrastructure.
Why Self-Host an AI Model?
Before diving into the technical setup, let’s understand why self-hosting makes sense for trading applications:
Data Privacy: Your trading strategies, market analysis, and proprietary algorithms never leave your infrastructure. This is crucial when working with sensitive financial data.
No Rate Limits: Unlike API-based services that throttle requests or charge per token, your self-hosted model runs as much as you need without restrictions.
Cost Predictability: You pay a fixed hourly rate for the GPU server regardless of usage. For high-volume applications processing hundreds of requests daily, this becomes significantly more economical than pay-per-token APIs.
Customization: Open-weight models can be fine-tuned on your specific trading data, terminology, and use cases, providing better results than generic models.
Zero Latency: Running the model on your own infrastructure eliminates internet round-trip time, crucial for time-sensitive trading applications.
Understanding the Architecture
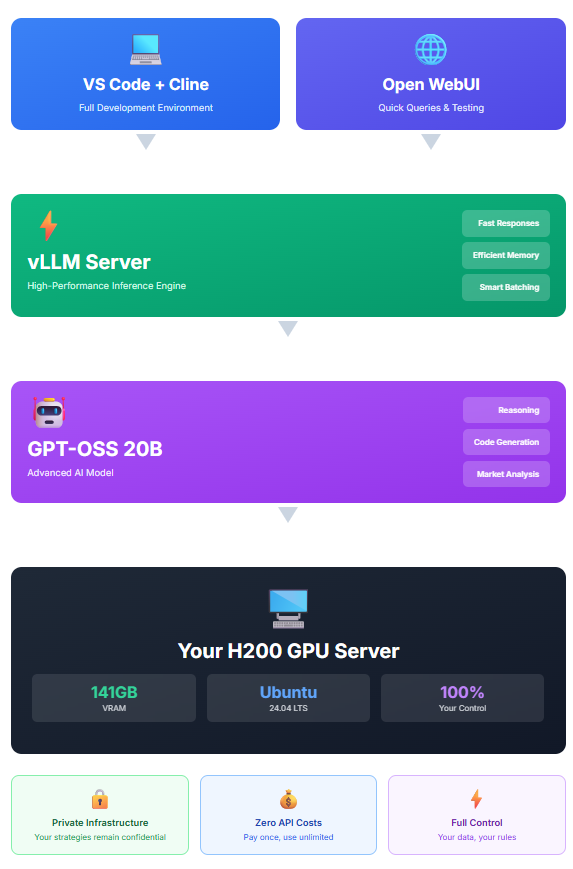
Our setup consists of four main components:
vLLM: A high-performance inference engine optimized for large language models. It handles GPU memory management, batching, and serves an OpenAI-compatible API.
GPT-OSS-20B: OpenAI’s open-weight model with 21 billion parameters. It uses a mixture-of-experts architecture with 3.6 billion active parameters, providing strong reasoning capabilities while remaining efficient.
Open-WebUI: A modern, ChatGPT-like web interface that connects to your vLLM server, providing an intuitive chat experience.
Docker: Containerization platform that simplifies deploying Open-WebUI with all its dependencies.
Prerequisites and Costs
Hardware Requirements
For GPT-OSS-20B, you need:
- GPU with at least 16GB VRAM (the model uses approximately 14GB)
- 8+ CPU cores recommended
- 32GB+ system RAM
- 100GB+ storage for model weights and system
For this guide, we use an NVIDIA H200 GPU with 141GB VRAM, which provides headroom for the larger GPT-OSS-120B model if needed later.
Estimated Costs
Using Datacrunch cloud infrastructure:
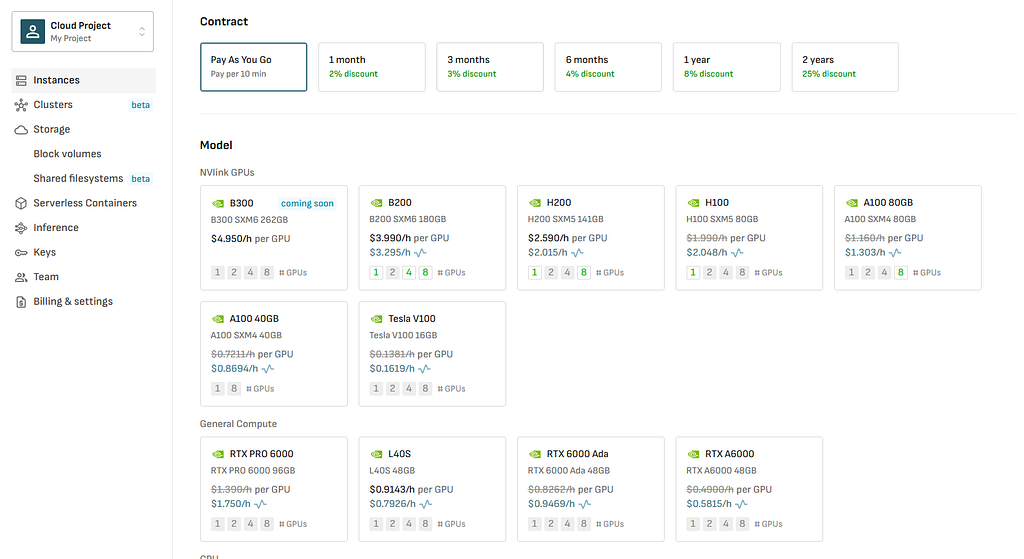
- H200 GPU instance: $2.59 per hour
- Storage (300GB): $0.082 per hour
- Total: approximately $2.67 per hour
If running 24/7, this equals roughly $1,951 per month. However, you can stop the instance when not in use, as billing is per minute. Running 8 hours daily costs approximately $642 per month.
Software Requirements
All software components are open-source and free:
- Ubuntu 24.04 (included with GPU instance)
- CUDA 12.8 (pre-installed)
- Docker (free)
- vLLM (open-source)
- GPT-OSS-20B model weights (Apache 2.0 license)
- Open-WebUI (open-source)
Step 1: Provisioning Your GPU Server
We use Datacrunch for GPU infrastructure due to competitive pricing and straightforward deployment.
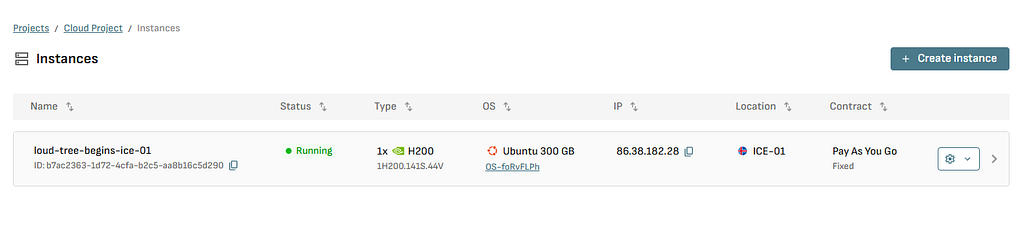
Create an account at https://cloud.datacrunch.io and provision a new instance with these specifications:
- Instance type: H200 (or H100 for a more budget-friendly option)
- Operating system: Ubuntu 24.04 with CUDA 12.8
- Storage: 300GB
- Location: Choose the closest data center for lowest latency
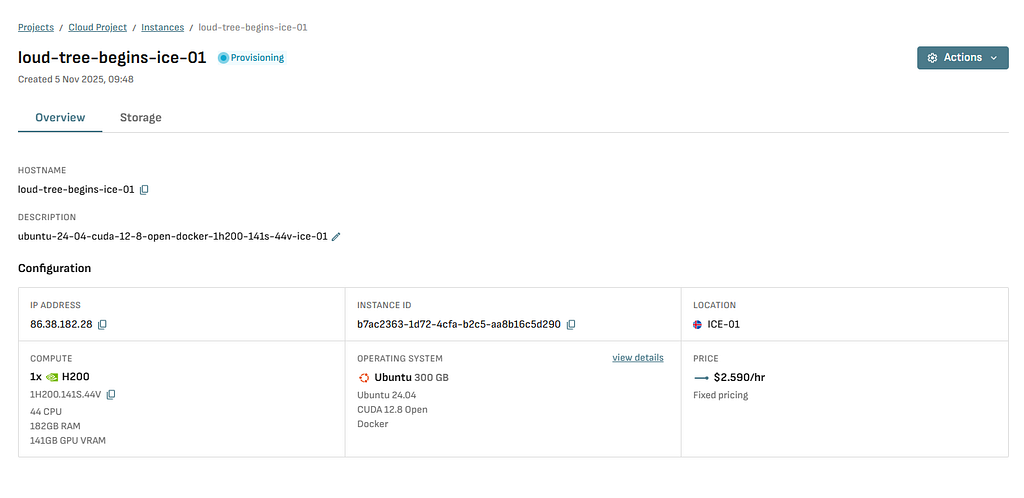
Once provisioned, you will receive:
- IP address (we’ll use xx.xx.xx.xx as placeholder)
Note : you need to create SSH key and apply the key while creating the GPU Cloud server. You’ll use it to connect to your server.
Step 2: Initial Server Setup
Connect to your server using SSH:
ssh -i gpukey root@xx.xx.xx.xx
First, verify your GPU is detected correctly:
nvidia-smi
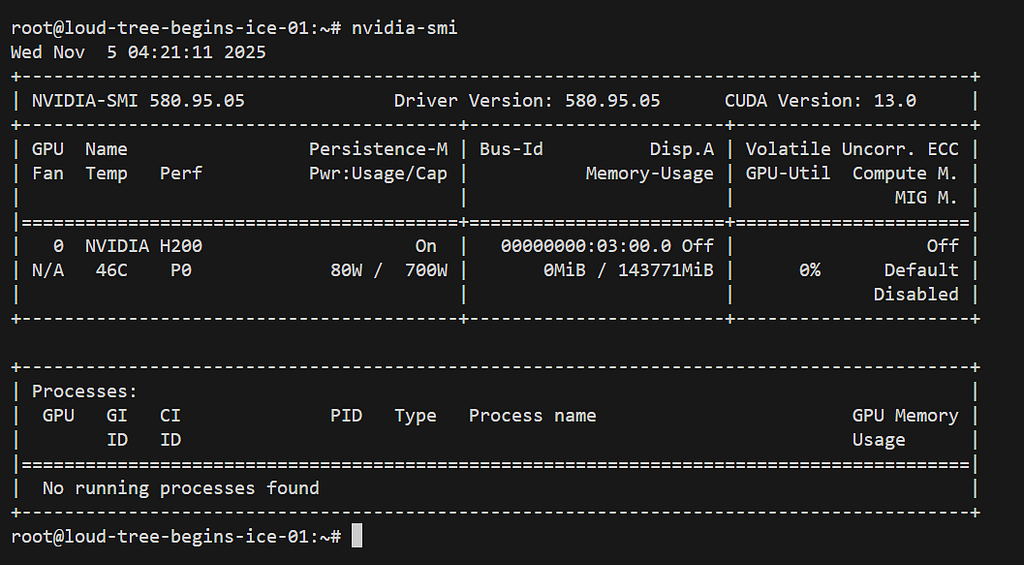
You should see your H200 GPU listed with approximately 141GB of memory.
Update system packages:
apt update && apt upgrade -y
Step 3: Firewall Configuration
Security is crucial when running public-facing AI infrastructure. Configure UFW (Uncomplicated Firewall) to allow only necessary ports:
# Install UFW if not present
apt install ufw -y
# Default policies
ufw default deny incoming
ufw default allow outgoing
# Allow SSH (critical - do this first!)
ufw allow 22/tcp
# Allow vLLM API
ufw allow 8000/tcp
# Allow Open-WebUI
ufw allow 3000/tcp
# Enable firewall
ufw enable
# Verify configuration
ufw status
Your output should show:
Status: active
(venv) root@loud-tree-begins-ice-01:~/gpt-20b-server# ufw status
Status: active
To                         Action      From
--                         ------      ----
22/tcp                     ALLOW       Anywhere
22                         ALLOW       Anywhere
8000                       ALLOW       Anywhere
3000                       ALLOW       Anywhere
22/tcp (v6)                ALLOW       Anywhere (v6)
22 (v6)                    ALLOW       Anywhere (v6)
8000 (v6)                  ALLOW       Anywhere (v6)
3000 (v6)                  ALLOW       Anywhere (v6)
(venv) root@loud-tree-begins-ice-01:~/gpt-20b-server#
Step 4: Installing Docker
Open-WebUI runs in a Docker container for simplified deployment.
Install Docker:
# Add Docker's official GPG key
apt-get update
apt-get install ca-certificates curl -y
install -m 0755 -d /etc/apt/keyrings
curl -fsSL https://download.docker.com/linux/ubuntu/gpg -o /etc/apt/keyrings/docker.asc
chmod a+r /etc/apt/keyrings/docker.asc
# Add repository
echo \
  "deb [arch=$(dpkg --print-architecture) signed-by=/etc/apt/keyrings/docker.asc] https://download.docker.com/linux/ubuntu \
  $(. /etc/os-release && echo "$VERSION_CODENAME") stable" | \
  tee /etc/apt/sources.list.d/docker.list > /dev/null
# Install Docker
apt-get update
apt-get install docker-ce docker-ce-cli containerd.io docker-buildx-plugin docker-compose-plugin -y
Verify Docker installation:
docker --version
(venv) root@loud-tree-begins-ice-01:~/gpt-20b-server# docker --version
Docker version 28.5.1, build e180ab8
Verify Cuda Version
nvcc --version
(venv) root@loud-tree-begins-ice-01:~/gpt-20b-server# nvcc --version
nvcc: NVIDIA (R) Cuda compiler driver
Copyright (c) 2005-2025 NVIDIA Corporation
Built on Fri_Feb_21_20:23:50_PST_2025
Cuda compilation tools, release 12.8, V12.8.93
Build cuda_12.8.r12.8/compiler.35583870_0
(venv) root@loud-tree-begins-ice-01:~/gpt-20b-server#
Install NVIDIA Container Toolkit to give Docker containers GPU access:
curl -fsSL https://nvidia.github.io/libnvidia-container/gpgkey | gpg --dearmor -o /usr/share/keyrings/nvidia-container-toolkit-keyring.gpg
curl -s -L https://nvidia.github.io/libnvidia-container/stable/deb/nvidia-container-toolkit.list | \
  sed 's#deb https://#deb [signed-by=/usr/share/keyrings/nvidia-container-toolkit-keyring.gpg] https://#g' | \
  tee /etc/apt/sources.list.d/nvidia-container-toolkit.list
apt-get update
apt-get install -y nvidia-container-toolkit
nvidia-ctk runtime configure --runtime=docker
systemctl restart docker
Test GPU access from Docker:
docker run --rm --gpus all nvidia/cuda:12.2.0-base-ubuntu22.04 nvidia-smi
If you see your GPU information, Docker is correctly configured.
Step 5: Setting Up Python Environment for vLLM
Create a dedicated directory and Python virtual environment:
mkdir -p ~/gpt-20b-server
cd ~/gpt-20b-server
Install Python virtual environment tools:
apt install python3-venv python3-pip -y
Create and activate virtual environment:
python3 -m venv venv
source venv/bin/activate
Your prompt should now show (venv) indicating the virtual environment is active.
Install vLLM and dependencies:
pip install --upgrade pip
pip install vllm
pip install openai-harmony
The installation takes several minutes as it downloads CUDA libraries and PyTorch.
Step 6: Downloading GPT-OSS-20B Model
The model weights are hosted on Hugging Face and total approximately 41GB.
Install Hugging Face CLI:
pip install huggingface-hub
Create a directory for model storage:
mkdir -p ~/models
Download GPT-OSS-20B:
huggingface-cli download openai/gpt-oss-20b --local-dir ~/models/gpt-oss-20b
This download takes 10–15 minutes depending on your connection speed. The CLI shows progress as it downloads 18 files including model weights, tokenizer, and configuration files.
Step 7: Launching vLLM Server
With the model downloaded, start the vLLM inference server.
Set required environment variable:
# Export environment variable
export VLLM_USE_FLASHINFER_SAMPLER=0
Start vLLM in background:
# Start vLLM server
nohup python -m vllm.entrypoints.openai.api_server \
  --model openai/gpt-oss-20b \
  --download-dir ~/models \
  --host 0.0.0.0 \
  --port 8000 \
  --dtype auto \
  --gpu-memory-utilization 0.9 \
  --max-model-len 32768 \
  --trust-remote-code \
  > vllm-server.log 2>&1 &

PID=$!
echo "📋 Process ID: $PID"
echo "⏳ Server is starting (takes 2-3 minutes)..."
echo ""
Configuration parameters explained:
- --model: Specifies which model to load
- --download-dir: Where model files are stored
- --host 0.0.0.0: Listen on all network interfaces
- --port 8000: API port
- --dtype auto: Automatically select optimal precision
- --gpu-memory-utilization 0.5: Use 50% of GPU memory (conservative for 20B model)
- --max-model-len 8192: Maximum context window size
- --trust-remote-code: Required for GPT-OSS custom code
Monitor the startup process:
tail -f vllm-gptoss.log
Wait for the message “Application startup complete.” This takes 2–3 minutes as the model loads into GPU memory.
Press Ctrl+C to exit the log viewer. The server continues running in the background.
Step 8: Verifying vLLM API
Test that the API is responding correctly:
curl http://localhost:8000/health
Expected output: {"status":"ok"}
Check available models:
curl http://localhost:8000/v1/models
You should see JSON output listing openai/gpt-oss-20b as an available model.
Test a simple completion:
curl http://localhost:8000/v1/chat/completions \
  -H "Content-Type: application/json" \
  -d '{
    "model": "openai/gpt-oss-20b",
    "messages": [
      {"role": "user", "content": "What is algorithmic trading?"}
    ],
    "max_tokens": 200
  }'
If you receive a JSON response with generated text, your vLLM server is working correctly.
Step 9: Deploying Open-WebUI
Open-WebUI provides a modern chat interface similar to ChatGPT.
Start the Open-WebUI Docker container:
docker run -d \
  --name open-webui \
  --gpus all \
  -p 3000:8080 \
  --add-host=host.docker.internal:host-gateway \
  -v open-webui:/app/backend/data \
  -e OPENAI_API_BASE_URL=http://host.docker.internal:8000/v1 \
  -e OPENAI_API_KEY=dummy \
  -e WEBUI_AUTH=False \
  ghcr.io/open-webui/open-webui:cuda
Configuration breakdown:
- --name open-webui: Container name
- --gpus all: GPU access (for potential future features)
- -p 3000:8080: Map container port 8080 to host port 3000
- --add-host: Allows container to reach host's localhost
- -v open-webui: Persistent storage for conversations
- -e OPENAI_API_BASE_URL: Point to your vLLM server
- -e OPENAI_API_KEY: Dummy key (vLLM doesn't require authentication)
- -e WEBUI_AUTH=False: Disable login for simplicity
Wait 15–20 seconds for the container to start, then check status:
docker ps
You should see the open-webui container with status "healthy".
Step 10: Accessing Your AI Interface
Open your web browser and navigate to:
http://xx.xx.xx.xx:3000
Replace xx.xx.xx.xx with your actual server IP address.
You should see the Open-WebUI interface. Click on the model selector dropdown at the top of the page. You should see “openai/gpt-oss-20b” listed.
Select the model and start chatting. Try a test prompt:
Explain the difference between momentum and mean reversion trading strategies.
The first response takes 15–20 seconds as CUDA performs initial warmup. Subsequent responses are much faster, typically 5–10 seconds.
Understanding Performance Metrics
vLLM automatically logs performance metrics. View them in real-time:
tail -f ~/gpt-20b-server/vllm-gptoss.log | grep "throughput"
Key metrics to watch:
Prompt Throughput: Speed of processing your input text, typically 200–300 tokens per second.
Generation Throughput: Speed of generating output text. For GPT-OSS-20B on H200, expect 100–120 tokens per second.
GPU KV Cache Usage: Memory used for caching previous tokens in conversation. Should stay below 10% for optimal performance.
These metrics help you understand system performance and identify bottlenecks.
Configuring VS Code Integration
For developers who want AI assistance while coding, integrate with VS Code using the Continue extension.
Install the Continue extension from VS Code marketplace.
Open Continue settings and edit config.json:
{
  "models": [
    {
      "title": "GPT-OSS-20B",
      "provider": "openai",
      "model": "openai/gpt-oss-20b",
      "apiKey": "dummy",
      "apiBase": "http://xx.xx.xx.xx:8000/v1",
      "contextLength": 32768,
      "completionOptions": {
        "maxTokens": 8000,
        "temperature": 0.7
      }
    }
  ]
}
Replace xx.xx.xx.xx with your server IP. Save the configuration and restart VS Code.
You can now use your self-hosted model directly within your code editor.
Use Cases for Trading Applications
With your AI infrastructure running, here are practical applications for algorithmic trading:
Strategy Documentation: Generate comprehensive documentation for your trading strategies, explaining logic, parameters, and risk management in plain English.
Code Generation: Create boilerplate code for backtesting frameworks, data pipelines, or API integrations. For example: “Write a Python function to calculate Bollinger Bands for a given price series.”
Market Analysis: Analyze earnings reports, news sentiment, or market commentary. Feed the model text data and ask for structured insights.
Educational Content: Generate explanations of complex trading concepts for courses or blog posts. The model understands financial terminology and can explain at various expertise levels.
Data Transformation: Convert between different data formats, clean datasets, or generate test data for backtesting systems.
Debugging Assistant: Paste error messages or problematic code and ask for debugging suggestions, particularly useful for complex algorithmic strategies.
API Documentation: Generate API documentation for your trading systems or explain third-party API endpoints in simple terms.
Reasoning Levels in GPT-OSS
GPT-OSS supports three reasoning levels that can be specified in system prompts:
Low Reasoning: Fast responses for simple questions. Use when speed is more important than depth. Example: “Reasoning: low”
Medium Reasoning: Balanced approach with good quality and acceptable speed. This is the default. Example: “Reasoning: medium”
High Reasoning: Deep analysis for complex problems. Takes longer but provides more thorough answers. Example: “Reasoning: high”
Set the reasoning level in your system prompt:
{
  "role": "system",
  "content": "Reasoning: high\n\nYou are a trading strategy analyst."
}
Monitoring and Maintenance
Check vLLM Status
ps aux | grep vllm
If the process isn’t running, restart it using the command from Step 7.
View Recent Logs
tail -100 ~/gpt-20b-server/vllm-gptoss.log
Check GPU Memory Usage
nvidia-smi
Monitor GPU utilization and memory. GPT-OSS-20B should use approximately 14GB of VRAM.
Check Open-WebUI Status
docker ps -a | grep open-webui
If the container stopped, restart it:
docker restart open-webui
View Open-WebUI Logs
docker logs open-webui | tail -50
Upgrading to GPT-OSS-120B
If you need higher quality reasoning and have sufficient VRAM (80GB minimum), upgrade to the larger model.
Stop the current vLLM server:
pkill -f vllm
Download GPT-OSS-120B:
cd ~/gpt-20b-server
source venv/bin/activate
huggingface-cli download openai/gpt-oss-120b --local-dir ~/models/gpt-oss-120b
Start vLLM with the larger model:
# Export environment variable
export VLLM_USE_FLASHINFER_SAMPLER=0

# Start vLLM server
nohup python -m vllm.entrypoints.openai.api_server \
  --model openai/gpt-oss-120b \
  --download-dir ~/models \
  --host 0.0.0.0 \
  --port 8000 \
  --dtype auto \
  --gpu-memory-utilization 0.9 \
  --max-model-len 32768 \
  --trust-remote-code \
  > vllm-server.log 2>&1 &

PID=$!
echo "📋 Process ID: $PID"
echo "⏳ Server is starting (takes 2-3 minutes)..."
echo ""
The 120B model provides near-GPT-4o quality at the cost of slower inference (60–80 tokens per second vs 100–120 for the 20B model).
Troubleshooting Common Issues
Issue: Cannot Connect to Web Interface
Check if Open-WebUI is running:
docker ps | grep open-webui
Verify firewall allows port 3000:
ufw status | grep 3000
Check Open-WebUI logs for errors:
docker logs open-webui
Issue: Model Not Appearing in Dropdown
Refresh your browser with Ctrl+F5 (hard refresh).
Verify vLLM is running:
curl http://localhost:8000/v1/models
Check Open-WebUI can reach vLLM:
docker exec open-webui curl http://host.docker.internal:8000/v1/models
Issue: Slow Response Times
Check GPU utilization during inference:
watch -n 1 nvidia-smi
If GPU utilization is low, increase batch size or concurrent requests. If it’s maxed out, your model is at capacity.
Review vLLM logs for performance metrics:
tail -f ~/gpt-20b-server/vllm-gptoss.log | grep "Engine"
Issue: Out of Memory Errors
Reduce --gpu-memory-utilization parameter:
--gpu-memory-utilization 0.4
Or decrease --max-model-len:
--max-model-len 4096
Issue: vLLM Won’t Start
Check logs for specific errors:
cat ~/gpt-20b-server/vllm-gptoss.log | grep -i error
Common causes include insufficient disk space, incorrect model path, or CUDA version mismatches.
Cost Optimization Strategies
Stop Instance When Not in Use
Datacrunch bills per minute. Stop your instance during non-working hours:
# On your local machine
ssh root@xx.xx.xx.xx "shutdown -h now"
Running 8 hours daily instead of 24/7 saves approximately $1,300 monthly.
Use Longer Commitments
Datacrunch offers discounts for longer contracts:
- 1 month: 2% discount
- 3 months: 3% discount
- 6 months: 4% discount
- 1 year: 8% discount
- 2 years: 25% discount
A 1-year commitment reduces costs from $1,951 to $1,737 monthly, saving $214 per month.
Consider Smaller GPUs
If GPT-OSS-20B meets your needs, an H100 (80GB) at $2.048/hour saves 21% compared to the H200, or approximately $375 monthly for 24/7 operation.
Use Spot Instances
Some providers offer spot instances at 50–70% discounts. However, these can be interrupted with short notice. Suitable for non-production workloads.
Security Considerations
Change Default Ports
For production deployments, consider non-standard ports:
ufw delete allow 8000/tcp
ufw delete allow 3000/tcp
ufw allow 18000/tcp  # Custom vLLM port
ufw allow 13000/tcp  # Custom WebUI port
Update your vLLM and Docker run commands accordingly.
Enable Authentication
Open-WebUI supports authentication. Remove the WEBUI_AUTH=False flag and configure user accounts through the web interface.
Use Reverse Proxy
For production, place Nginx in front of your services:
apt install nginx -y
Configure Nginx to handle SSL/TLS, rate limiting, and access controls.
Restrict SSH Access
Limit SSH to specific IP addresses:
ufw delete allow 22/tcp
ufw allow from YOUR_IP_ADDRESS to any port 22
Regular Updates
Keep your system updated:
apt update && apt upgrade -y
Update vLLM regularly:
cd ~/gpt-20b-server
source venv/bin/activate
pip install --upgrade vllm
Credits and Acknowledgments
This guide builds upon the work and contributions of several individuals and projects:
OpenAI: For releasing GPT-OSS-20B and GPT-OSS-120B under the permissive Apache 2.0 license, making powerful AI accessible to everyone.
1littlecoder: YouTube creator whose cutting-edge AI tutorials and practical demonstrations helped validate these approaches and educated the broader community on working with modern LLMs.
vLLM Development Team: For creating and maintaining the high-performance inference engine that makes running large models practical and efficient.
Open-WebUI Team: For developing the excellent web interface that brings a professional ChatGPT-like experience to self-hosted models.
Hugging Face: For hosting model weights and providing infrastructure that makes distributing open-source models seamless.
Datacrunch: For providing competitively priced GPU infrastructure with modern hardware and developer-friendly features.
Docker and NVIDIA: For containerization technology and CUDA toolkit that simplifies deployment and GPU access.
Additional Resources
Official Documentation
- OpenAI GPT-OSS Model Card: https://openai.com/index/gpt-oss-model-card/
- vLLM Documentation: https://docs.vllm.ai
- Open-WebUI Documentation: https://docs.openwebui.com
- Hugging Face GPT-OSS Hub: https://huggingface.co/openai/gpt-oss-20b
Community Resources
- vLLM GitHub: https://github.com/vllm-project/vllm
- Open-WebUI GitHub: https://github.com/open-webui/open-webui
- OpenAI GPT-OSS Announcement: https://openai.com/index/introducing-gpt-oss/
Learning Materials
- 1littlecoder YouTube Channel: Search for latest AI/ML tutorials
- Hugging Face Blog on GPT-OSS: https://huggingface.co/blog/welcome-openai-gpt-oss
Conclusion
Self-hosting AI infrastructure provides traders and developers with unprecedented control, privacy, and cost efficiency. With GPT-OSS-20B, you have access to a capable reasoning model that handles everything from code generation to market analysis without external dependencies.
The initial setup requires some technical investment, but the result is a production-ready system that serves unlimited requests at a fixed cost. For high-volume applications, trading strategy development, or educational content creation, this approach offers significant advantages over API-based services.
As open-source AI continues to evolve, having your own infrastructure positions you to experiment with new models, fine-tune on proprietary data, and build sophisticated AI-powered trading tools without vendor lock-in.
The complete setup outlined in this guide provides a solid foundation. From here, you can explore fine-tuning models on your trading data, building RAG systems with your research, or integrating AI into your existing trading infrastructure.
Whether you’re developing algorithmic strategies, creating educational content, or building trading tools, self-hosted AI gives you the flexibility and control to innovate without constraints.
Disclaimer
This article is for educational purposes. Trading involves substantial risk of loss. AI-generated content should not be considered financial advice. Always verify AI outputs and conduct thorough testing before deploying any trading strategies.
